We built some code in PHP that performs most if the 3.x admin console functions. Now with 5.x there appears to be RESTful services to do the same. Does anyone have code examples they are willing to share that uses RESTful services to add users, add roles, add solutions, add datasources? Change the same, assign roles, deletes the same?I think it is an interesting question. I haven't seen many people integrating Pentaho in their PHP web applications so I decided to do a quick write up to demonstrate that this is not only possible but actually quite easy.
For this write up, I used the following software:
- Pentaho 5.2 Business Analytics Server, community edition
- Apache 2 2.4.6 (2ubuntu2.2, default from my Ubuntu distro)
- PHP Version 5.5.3 (1ubuntu2.6, default from my Ubuntu distro)
- The Client URL (cURL) library for PHP
- The SimpleXML library for PHP
Pentaho 5.x RESTful Webservices
Pentaho 5.x featured major refactoring to modernize its webservices to be more RESTful. Here's an overview of all the services.All these webservices reside under the
/api path beneath the path of the Pentaho web application, which is by default in the /pentaho path at the root of the server. Each service has a distinct path beneath the /api path. So assuming the pentaho server is running on the localhost (at the default port of 8080), you can access all calls offered by a particular service beneath http://localhost:8080/pentaho/api/service-specific-path.
The Pentaho 5.x webservices are, to some extent, self-documenting. You can get an overview of the available call for a specific service by doing a HTTP
OPTIONS request to the root path of the service. For example, an OPTIONS request to http://localhost:8080/pentaho/api/session might return a document like this to describe the service:
<?xml version="1.0" encoding="UTF-8" standalone="yes"?>
<application xmlns="http://wadl.dev.java.net/2009/02">
  <doc xmlns:jersey="http://jersey.java.net/" jersey:generatedBy="Jersey: 1.16 11/28/2012 03:18 PM"/>
  <grammars>
    <include href="http://localhost:8080/pentaho/api/application.wadl/xsd0.xsd">
      <doc title="Generated" xml:lang="en"/>
    </include>
  </grammars>
  <resources base="http://localhost:8080/pentaho/api/">
    <resource path="session">
      <resource path="/setredirect">
        <method id="setredirect" name="GET">
          <response>
            <representation mediaType="text/plain"/>
          </response>
        </method>
      </resource>
      <resource path="/userWorkspaceDir">
        <method id="doGetCurrentUserDir" name="GET">
          <response>
            <representation mediaType="text/plain"/>
          </response>
        </method>
      </resource>
      <resource path="/workspaceDirForUser/{user}">
        <param xmlns:xs="http://www.w3.org/2001/XMLSchema" name="user" style="template" type="xs:string"/>
        <method id="doGetUserDir" name="GET">
          <response>
            <representation mediaType="text/plain"/>
          </response>
        </method>
      </resource>
    </resource>
  </resources>
</application>
The documentation provides a categorized overview of the service calls, as well as the necessary technical information, such as:
- The HTTP method
- In general, with very few exceptions, Pentho's web services use either
GET(to retrieve information) orPUT(to modify or change data). There are a few calls that usePOST(for example, the publish service). As far as I know,DELETEis not used. - Parameters
- If a service accepts parameters, they are either passed through the query string or as a document in the request message body. This is colloquially known as the POST data, regardless of whether the
POSTmethod is actually used.
As per the design of the HTTP protocol,GETcalls only accept parameters via the query string. ThePUTcalls to the Pentaho webservices sometimes accept parameters via the query string. This happens only if the information passed in the parameter has a relatively simple structure - think of a single key/value pair, or maybe a list of values. More complicated data is typically conveyed via the message body. - Data type information
- In general Pentaho's web services support both XML and JSON. You can control the data format of the response by specifying the
Acceptrequest header. To specify the format of the request message body, you should use theContent-Typeheader in the request.
For this write-up, I decided to focus on the administrative interface around users, roles and privileges.
NOTE: The link above only lists the web services that are built into the Pentaho Business Analytics Platform. The platform can, and ususally does, have multiple plugins that offer extra functionality and some of these plugins ship by default with the server so that one might consider those also as builtins. Each plugin can, and often does, offer its own service calls, but these are not listed in the documentation referred to above. A discussion of these is also out of scope for this write-up but I will try and get back on this topic in a future blog post. If you don't feel like waiting that long, you can try and figure out the webservice calls offered by a particular plugin by doing an
OPTIONS request to the root path corresponding to a particular plugin. The root path of a particular plugin is http://localhost:8080/pentaho/plugin/plugin-id/api. You can obtain a list of all installed plugins by doing a GET request the ids service of the PluginManagerResource services.
Suggested Tools
I found the following tools to be very useful in inspecting and experimenting with the Pentaho webservices api.- Administration perspective in the Pentaho user console. This web application ships with Pentaho and is normally used by Pentaho administrators to manage users, roles and privileges. Basically, we want to offer the functionality provided by this web application, but then with PHP.
- The network tab in google chrome's developer tools. I used the network tab to monitor calls from Pentaho's administration perspective to the services provided by the Pentaho server.
- Postman REST client. This is a handy extension from the chrome webstore. It allows you to do all kinds of REST calls directly from within your chrome browser. This was useful to test any assumptions on the details of how to exactly construct requests to the Pentaho web services.
The UserRoleDaoResource services
All functionality to work with users, roles and privileges is bundled in the UserRoleDaoResource service. The services specific path of this service is/userroledao. So, all calls that belong to the UserRoleDaoResource service can be accessed through the path http://localhost:8080/pentaho/api/userroledao.
The following categorized overview illustrates the different kinds of calls that belong to the UserRoleDaoResource service:
- Users
- Named accounts. An account is typically associated with a particular person that needs to work with the Pentaho server. The following calls are specific to working with users:
GETusers- Retrieve the list of existing Pentaho user accounts.
PUTcreateUser- Create a new Pentaho user account.
PUTupdatePassword- Modify the password of the specified user.
PUTdeleteUsers- Remove one or more Pentaho user accounts.
- Roles
- Roles are basically a package of privileges (system roles), which can be assigned to one or more users. Any given user can be assigned multiple roles.
GETroles- Retrieve the list of existing roles.
PUTcreateRole- Create a new role. After the role is created, privileges can be assigned to it, and the role can then be assigned to one or more users, effectively granting the associated privileges to those users.
PUTdeleteRoles- Remove one or more roles.
- Assignments
- Users can get assigned multiple roles and many users can be assigned a particular role. The following calls can be used to create or remove these assocations:
PUTassignAllRolesToUser- Assign all available roles to the specified user.
PUTassignAllUsersToRole- Assign the specified role to all available users.
PUTassignRoleToUser- Assign a specific role to a particular user.
PUTassignUserToRole- Assign a specific role to a particular user.
PUTremoveAllRolesFromUser- Unassign whatever roles were assigned to a specific user.
PUTremoveAllUsersFromRole- Take the specified role away from all users that were assigned the role.
PUTremoveRoleFromUser- Unassign a specific role from a particular user.
PUTremoveUserFromRole- Unassign a specific role from a particular user.
- System Roles (also called Logical Roles)
- These are essentially privileges: the ability to perform a particular action. Examples of such actions are Read BI content, Publish BI content, Schedule a job etc. In Pentaho, system roles cannot be assigned directly to users; instead, they have to be assigned to a role. Roles can then be associated to users to effectively grant them the privileges associated with the role.
GETlogicalRoleMap- This returns a document containing two separate bits of information: the list of available system roles, as well as the association between regular roles and system roles.
PUTroleAssignments- Specify which system roles are associated with a particular regular role. Note that there is no separate call to add or remove individual associations between a role and a system role: rather, an entire set of system roles is assigned to a role at once, removing whatever set was assigned prior to that role.
OPTIONS request at the root of the /pentaho/api/userroledao path.
Webservice calls in PHP with cURL
Typically, calling out to HTTP (or FTP) servers from within PHP is done using the cURL library. A full discussion of cURL in PHP is well out of scope; you can refer to the - excellent - official PHP documentation instead. I will only discuss the basic pattern and only in as far as it applies to calling the Pentaho webservices.Basic cURL calling sequence
The basic cURL calling sequence may be summarized as follows:- Obtain a cURL handle by calling
curl_init(). You should save the handle to a variable so you can use it in subsequent calls to the cURL library. - Configure the cURL request by doing various calls to
curl_setopt($handle, $option, $value). Eachcurl_setoptcall basically sets a property ("option") on the cURL handle that is passed as first argument tocurl_setopt(). The library defines a large number of property keys to control the various aspects of the HTTP request, such as the HTTP method, the request headers, message body etcetera. - Call
curl_exec()to send the request. This function will also return the response if a prior call tocurl_setopt($handle, CURLOPT_RETURNTRANSFER, TRUE)was made. - Optionally, information about the response can be obtained by calling
curl_getinfo() - Finally,
curl_close($handle)should be called to clean up the cURL handle and free any underlying resources used by the library.
Basic GET request to Pentaho with PHP/cURL
The following snippet shows how to do a GET request to Pentaho using PHP/cURL:<?php //obtain a cURL handle $c = curl_init(); //specify the url and the HTTP method curl_setopt($c, CURLOPT_URL, 'http://localhost:8080/pentaho/api/userroledao/users'); curl_setopt($c, CURLOPT_CUSTOMREQUEST, 'GET'); //supply credentials to authenticate against pentaho curl_setopt($curl_handle, CURLOPT_USERPWD, 'admin:password'); //tell cURL to return the response as a string curl_setopt($c, CURLOPT_RETURNTRANSFER, TRUE); //obtain the response $response = curl_exec($c); //get the HTTP status code $status = curl_getinfo($c, CURLINFO_HTTP_CODE); //clean up the cURL handle curl_close($c); ?>As you can see the snippet follows the general cURL calling sequence. The options
CURLOPT_URL and CURLOPT_CUSTOMREQUEST are used to specify the url and the HTTP method respectively, and CURLOPT_RETURNTRANSFER is set to TRUE to obtain the response as a string result when calling curl_exec.
The
CURLOPT_USERPWD option is used to specify the credentials for basic HTTP authentication. The value is a string consisting of the username and password, separated by a colon, and the example uses the default built-in administrator's account called admin with the password password.
Note: The web service requests described in this blog post require authentication with the
admin account, or at least an account that is privileged to perform administrative actions. Other webservices my work while being authenticated with less privileged accounts.
No specific request headers were set in this example. Because there is no specific
Accept header to specify a format for the response, the default format will be used, which happens to be XML.
After executing this snippet, the variable
$response will have a string value equivalent to the following document:
<?xml version="1.0" encoding="UTF-8" standalone="yes"?>
<userList>
    <users>suzy</users>
    <users>pat</users>
    <users>tiffany</users>
    <users>admin</users>
</userList>
We could have added an extra call to curl_setopt() to explicitly set the Accept header to specify that we want to receive the response in the JSON format:<?php //obtain a cURL handle $c = curl_init(); ...other calls to curl_setopt... curl_setopt($c, CURLOPT_HTTPHEADER, array( 'Accept: application/json' )); $response = curl_exec($c); curl_close($c); ?>Note that all request headers must be passed as an array of strings using a single call to
curl_setopt($handle, CURLOPT_HTTP_HEADER, $array_of_header). Each element of the array of headers should be a single string, consisting of the header name followed by a colon followed by the header value.
After executing this snippet, the variable
$response will contain a string equivalent to the following JSON document:
{
    "users": [
        "suzy",
        "pat",
        "tiffany",
        "admin"
    ]
}
While the format for the response defaults to XML, it is generally a good idea to always explicitly specify it. In order to explicitly request for XML, change the value for the Accept header to application/xml.
Processing the response
PHP has support for both XML as well as JSON. In this write-up I'll only use XML but it is good to realize that it would have worked just as well if we had used JSON. As PHP offers exactly one library for working with JSON, there many options for processing XML. (I'm inclined to say, way too many.)Fortunately, for this particular task, the XML documents are always simple and never very large, and I have had good results working with the SimpleXML library. I believe this is included and enabled by default, which makes it a safe choice. Another reason why I like SimpleXML is that it offers exceptionally convenient access to the data in the XML document using property access operators and iterators.
It would be outside the scope of this write-up to discuss SimpleXML in detail but the following snippet may illustrate how easy it is to process an XML document like the
<userList> response obtained from the GET to the /userroledao/users API call described above:
<?php
  $userlist = ...response from /userroledao/users...

  //parse xml string
  $doc = simplexml_load_string($userlist);

  //iterate elements
  foreach ($doc as $user) {
    //do something with the <user> element.
    //even though $user is an object we can easily extract its value by treating it as a string
    echo('<div>'.$user.'</div>');
  }
?>
As you can see, it doesn't ever get much simpler than this: one call to simplexml_load_string to parse the xml document, and we can directly traverse the elements using foreach. Plus accessing the text content of the elements is also very easy: no need for a separate call to extract the text, just treat the element as a string. Note that if you do need more advanced ways to traverse the structure of the document and access the data, the SimpleXML library still goes a long way. You can even use XPath expressions, if you really need that.
Putting it together: a simple Pentaho Admin application in PHP
Using the techniques described above, and an argueably minimal amount of client side javascript, I put together a simple, yet fully functional administrative application for managing Pentaho roles, users and privileges in PHP. It is a single, self-contained script (php, html template, and javascript - no css) of just over 600 lines, including whitespace and comments. Here's what the application looks like: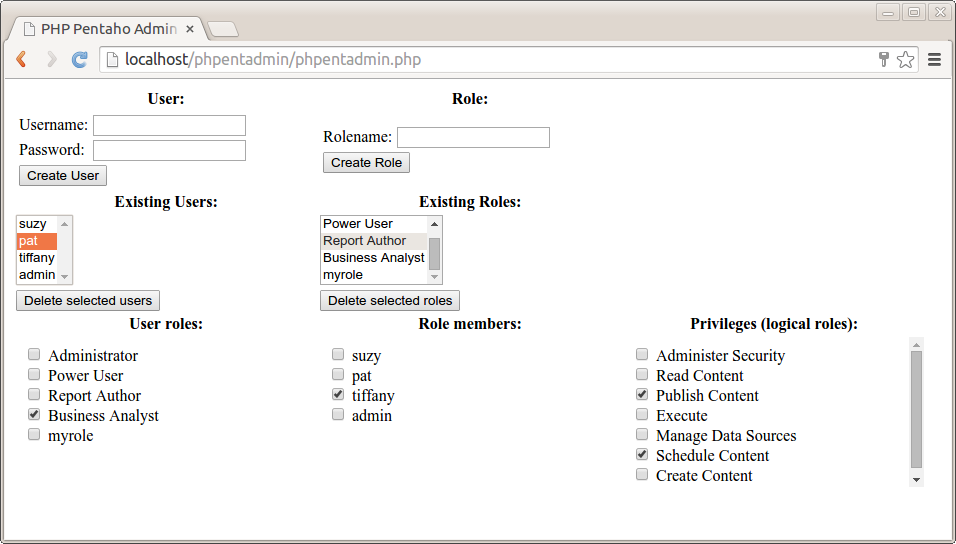
User management features
The left had side of the page is dedicated to user management. From top to bottom we have:- User form
- In the left top we have a form with fields for "Username" and "Password", and a "Create User" button. Hitting the button results in a
PUTrequest to/userroledao/createUserto create a new user using the values in the "Username" and "Password" fields. - Existing Users list
- Halfway the page below the user form there's a list showing the existing users. This is populated with the data from the response of a
GETrequest to/userroledao/users. - Delete selected users button
- Hitting this button fires a javascript function that collects the selection from the existing user list. This is used to do a
PUTrequest to the/userroledao/deleteUsersservice in order to delete those user accounts. - User roles list
- When a single user is selected in the existing users list a
GETrequest is made to the/userroledao/rolesservice to create a list of all available roles. AnotherGETrequest is made to the/userroledao/userRolesservice and the data from the response is used to set the state of the checkboxes in front of the role names, indicating which roles are assigned to the user. If such a checkbox is checked by user interaction, aPUTrequest is made to the/userroledao/assignRoleToUserservice, which will assign the corresponding role to the currently selected user. If the checkbox gets unchecked through user interaction, aPUTrequest is made to the/userroledao/removeRoleFromUserservice, which will unassign the corresponding role from the currently selected user.
Role management features
The right had side of the page is dedicated to role management. From top to bottom we have:- Role form
- In the right top we have a form with a "Rolename" field and a "Create Role" button. Hitting the button results in a
PUTrequest to/userroledao/createRoleto create a new role with the specified role name. - Existing Roles list
- Halfway the page below the role form there's a list showing the existing roles. This is populated with the data from the response of a
GETrequest to/userroledao/roles. - Delete selected roles button
- Hitting this button fires a javascript function that collects the selection from the existing roles list. This is used to do a
PUTrequest to the/userroledao/deleteRolesservice in order to delete those roles. - Role members list
- When a single role is selected in the existing roles list a
GETrequest is made to the/userroledao/usersservice to create a list of all available users. AnotherGETrequest is made to the/userroledao/userRolesservice and the data from the response is used to check the appropriate checkboxes in front of the users names to indicate which users got the current role assigned. If such a checkbox is checked through user interaction, aPUTrequest is made to the/userroledao/assignUserToRoleservice to assign the currently selected role to the checked user. If such a checkbox gets unchecked due to user interaction, aPUTrequest is made to the/userroledao/removeUserFromRoleservice to unassign the currently selected role from the unchecked user. - Privileges (logical roles) list
- If a single role is selected in the existing roles list, a
GETrequest is done to the/userroledao/logicalRoleMapservice. The data from the response is used to create a list of all available privileges. From the same response, the list of logical roles assigned to the role selected in the existing role list is used to check the checkboxes in front of the logical role names in order to indicate which logical role names are assigned to the currently selected role. When such a checkbox is checked, or unchecked, aPUTrequest is done to the/userroledao/roleAssignmentsservice to associate the appropriate set of logical roles with the currently selected role
With a few (arguably non-essential) exceptions, this application covers all services of the UserRoleDaoResource.
Implementation details
For reference I will now discuss the implementation details of this application.User form
The user form can be used to create new users. Here's its corresponding HTML code:
<form method="POST">
  <table>
    <tr>
      <td>Username:</td>
      <td><input type="text" name="user" /></td>
    </tr>
    <tr>
      <td>Password:</td>
      <td><input type="password" name="password" /></td>
    </tr>
    <tr>
      <td colspan="2">
        <input type="submit" name="action" value="Create User"/>
      </td>
    </tr>
  </table>
</form>
Hitting the "Create User" button submits the form. But since the form element does not specify a specific action url, it will simply refresh the page, setting the form fields as POST data. In the top of the PHP script, this is handled with the following PHP code:
if (isset($_POST['action'])) {
  $action = strtolower($_POST['action']);
}
else {
  $action = NULL;
}
switch ($action) {
  case 'create user':
    $status = create_user($_POST['user'], $_POST['password']);
    break;
  case '...':
    ...
    break;

  ... many more case branches ...
}
In fact, all of the actions that the user can initiate result in a POST request that refreshes the page, setting a specific value for the action field to select the appropriate backend action. In case of the user form, this results in a call to the PHP function create_user(), passing the values of the POST data fields user and password, which originate from the HTML user form.
The PHP code of the
create_user() function is shown below:
//create a user with specified name and password.
function create_user($user, $password){
  $c = curl_init();

  curl_setopt($c, CURLOPT_CUSTOMREQUEST, 'PUT');
  curl_setopt($c, CURLOPT_URL, 'http://localhost:8080/pentaho/api/userroledao/createUser');

  curl_setopt($curl_handle, CURLOPT_USERPWD, 'admin:password');

  curl_setopt($c, CURLOPT_POSTFIELDS,
    '<user>'.
      '<userName>'.$user.'</userName>'.
      '<password>'.$password.'</password>'.
    '</user>'
  );
  curl_setopt($c, CURLOPT_HTTPHEADER, array(
    'Content-Type: application/xml'
  ));

  curl_exec($c);
  $status = curl_getinfo($c, CURLINFO_HTTP_CODE);

  curl_close($c);
  return $status;
}
The create_user function follows the basic pattern of the cURL calling sequence. The difference with the preceding generic example is that this is a PUT request, and thus the value for the CURLOPT_CUSTOMREQUEST option is 'PUT' rather than 'GET'.
The
/userroledao/createUser is specified to take a user-element in the request message body, which is used to convey the user name and password. This element is constructed as a XML document and passed to the message body using a curl_setopt call using the CURLOPT_POSTFIELDS option.
Because we are passing a message body in the request, we also need to set the
Content-Type header to application/xml to specify that the data passed in the message body is an XML document.
Finally, after the call to
curl_exec, we use a call to curl_getinfo() using the CURLINFO_HTTP_CODE constant to obtain the HTTP-status of the request. This should be 200 if the PUT request succeeds. If there is some problem with the request we should receive a code in the 400 range (if the request itself has some problem) or the the 500 range (in case the server is experiencing some problem that is not related to this particular request). For example, if the user already exists, one gets a 403 (Forbidden) status instead of 200.
Note: The Pentaho REST services do not seem to have a robust way to convey the exact nature of the problem in case the request could not be met. At least, I have not noticed any useful information being conveyed in the response except for the HTTP status code. I checked the Administration perspective in the Pentaho user console to see what would happen in case an existing users is entered, and there the action just silently fails. It would be nice to get a recommendation about how to deal with error situations when using the Pentaho web service calls.
The Existing Users list
The existing users list is one of the simplest items in the interface. The HTML / php code is shown below:
<select multiple="true" id="Users" onchange="userSelectionChanged(this)">
>?php
  $users = get_users();
  foreach ($users as $user) {
?>
   <option><?php echo($user); ?></option>
<?php
  }
?>
</select>
The get_users() function is a simple GET request to /userroledao/users, followed by a parse of the XML response. Since both these aspects have been discussed already I will not repeat that code here.
The
<select> element has an onchange event handler which calls to the javascript function userSelectionChanged(). Whenever the selection of the user list changes, that function will be called. This function will then determine if a single user is selected, and if that is the case, it will refresh the user role list by explicitly reloading the userRolesFrame:
function userSelectionChanged(list){

  //get the list selection as an array of user names
  var selection = [];
  for (var i = 0, options = list.options, n = options.length; i < n; i++) {
    if (options[i].checked) {
      selection.push(options[i].value);
    }
  }

  //get the user roles frame
  var frame = document.getElementById("userRolesFrame");

  if (selection.length === 1) {
    //if there's exaclty one selected user, then load its assigned roles in the frame
    frame.src = "?view=userRoles&user=" + selection[0];
  }
  else {
    //blank the frame
    frame.src = "about://blank";
  }
}
The user roles list
We just disussed how selecting a single item in the existing user list refreshes the user role list by loading theuserRolesFrame. The frame will be loading the current php script, passing values for the view and user parameters via the query string. The PHP script handles this by checking for the value of the view parameter in the query string. If now view parameter is present, the default interface will load as shown in the screenshot. But if specifying a value of userRoles for view will render only a list of roles, checking the roles that are assigned to the user specified by the user parameter, which is also passed via the query string:
<?php
  //see if a specific view was requested
  if (isset($_GET['view'])) {
    $view = $_GET['view'];
  }
  else {
    $view = NULL;
  }

  //select and render the requested view
  switch ($view) {

    //render the user roles view
    case 'userRoles':

      //get the current user
      $user = $_GET['user'];

      //get the current user's assigned roles
      $roles = get_user_roles($user);

      //store the user's roles as rolenames in an array
      $assigned_roles = array();
      foreach ($roles as $role) {
        array_push($assigned_roles, ''.$role);
      }

      //get all roles
      $roles = get_roles();

      //render all roles as a list of divs with a checkbox
      foreach ($roles as $role) {

        //if the current role appears in the array of assigned roles, check the checkbox.
        $checked = in_array(''.$role, $assigned_roles);
?>
        <div>
          <input
            onchange="changeUserRoleAssignment(this)"
            name="<?php echo($role) ?>"
            type="checkbox"
            <?php echo ($checked ? 'checked="true"' : '')?>
          />
          <?php echo($role) ?>
        </div>
<?php
      }
      break;
    case '...':

      ...code to handle other views here...

    default:

      ...code for the regular interface (no specific view) goes here...
  }
?>
First, get_user_roles($user) is called to GET a response from the /userroledao/userRoles service, which is a list of roles for the specified user. From the php side of things, nothing new is really happening here. The only difference with regard to getting the list of users is the url, which is now /userroledao/userRoles rather than /userroledao/users and which includes a querystring parameter to specify the user:curl_setopt($c, CURLOPT_URL, 'http://localhost:8080/pentaho/api/userroledao/userRoles?userName='.$user);The
get_user_roles($user) function calls returns an XML document containing <role>-elements representing the roles assigned to the specified users. We use the foreach loop to iterate them and we store their string values (i.e., the actual role names) in the array $assigned_roles.
The remainder of the code is very similar to how the existing user list was rendered, except that we now use a call to
get_roles() rather than get_users(). This does a GET request to /userroledao/roles and returns an XML document containing all available roles. We then iterate through that list to create an input-element of type checkbox along with the actual role name. The checkbox is checked according to whether the current role name is found in the previously populated $assigned_roles array.
Each checkbox is given an
onchange handler which is implemented by the changeUserRoleAssignment() javascript function. This function sets a few variables in a form to indicate whether the corresponding role is to be assigned or unassigned, and the submits the form. The code for the form and the function are shown below:
<form
  name="userRoleAssignment" method="POST"
  action="?view=<?php echo($view)?>&user=<?php echo(urlencode($user))?>"
>
  <input type="hidden" name="action"/>
  <input type="hidden" name="role"/>
  <input type="hidden" name="user" value="<?php echo($user)?>"/>
</form>

<script type="text/javascript">
  function changeUserRoleAssignment(checkbox) {
    var form = document.forms["userRoleAssignment"];
    form.elements["action"].value = checkbox.checked ? "assign role to user" : "unassign role from user";
    form.elements["role"].value = checkbox.name;
    form.submit();
  }
</script>
The changeUserRoleAssignment() function writes its associated role name (stored in its name property) in the role field of the form, and it uses its checked state to set the value of the action field to assign role to user or unassign role from user. It then submits the form.
Since this code appears all in the user role view, it has the effect of refreshing only the frame wherein the view is contained. Because the form sets the
action value, it triggers a PHP backend action before rendering the view (just like we saw in the implementation of the create user action):
switch ($action) {
  case 'create user':
    $status = create_user($_POST['user'], $_POST['password']);
    break;
  case 'assign role to user':
    assign_role_to_user($_POST['role'], $_POST['user']);
    break;
  case 'unassign role from user':
    unassign_role_from_user($_POST['role'], $_POST['user']);
    break;

  ... many more case branches ...
}
The PHP functions assign_role_to_user() and unassign_role_from_user() both perform a straightforward PUT request to the /userroledao/assignRoleToUser and /userroledao/removeRoleFromUser services respectively. For each these requests, the values of the user and role fields are passed to the service via the query string parameters userName and roleNames respectively.
Note that these two services support multiple role names; however only one is passed at any time by our application. Should you wish to pass multiple role names, then you should separate rolenames by a tab-character (ascii character
0x09). Note that since the names are passed in the query string, they must be url-encoded.
